Hello all of my furniture-lovin' friends. I'm so glad that spring is (almost) here, so yard sales can hit full swing. I thought surely spring was here when the daffodils bloomed and I spotted some green peeking out under the leaves on my hydrangea bushes. Well, it snowed last night. So much for hitting yard sales this weekend! For now, I can live vicariously through all of the links from warmer climates.
Next week, Furniture Feature Friday will be a little different. We'll have our normal link party, but I will add an additional featured link up for those who made slipcovers following my video tutorial series and would like to show them off. It's OK if you've already linked it up in the general party, you can link it up again to strut your stuff. If you're working on your slipcover, hurry, hurry! Have it finished, so you can link up. OK?
Here are some favorites from last week...
Kristin from My Uncommon Slice of Suburbia turned a bookcase into a clever cubby for her mudroom. Doesn't this space look right out of a Pottery Barn catalog? It's so bright, fresh and functional. Great work, girl!
Leslie from The Design File found these super groovy caned wing chairs for $30/piece. I would love to get my hands on these babies, although I would probably feel a bit like she does right now. "OK, I bought these. I took them home. Now what?"
Adri from Dream Book Design had a vision and never lost site of it. The result is this amazing kitchen makeover. The process wasn't always fun, but I can tell it was all worth it. (This is a good reminder for my bathroom reno that is dragging on.) I love your eclectic, yet classic style, Adri. Enjoy your beautiful space!
Link away!
Here are the rules for this get together...
1.) Your post has to be about furniture. Please, please, please...just furniture. If you find your link has been deleted, it's not because I'm mean, it's because your post was not about furniture. You can share makeovers, awesome finds, favorite pieces, furniture arrangements, or even pieces on your wish list! Built-in furniture like kitchen cabinets and bathroom vanities qualify as furniture.
2.) Post a permalink (the link to the post), not the link to your blog.
3.) The link party closes Friday at midnight PST and I will choose my favorite(s) and feature their piece on next week's FFF.
Here are a fascinating article and video in the NY Times about teaching woodworking to children and all the issues that brings up. I’m not sure if this is behind their paywall or not. My favorite quote, “Tetherball is more dangerous than the shop.” This will spark lots of conversation, which I think is badly needed. Despite shop class in schools becoming a thing of the past, it’s nice to know there is still such great interest in woodworking for children (and adults).
Someone had left it in an attic or barn or somewhere where it was exposed to heat. This heat made the poly finish bubble and it eventually cooled and hardened, leaving an amazing alligator skin texture. This would be a bad thing to most people. To me, it gave a texture I can't begin to reproduce.
Another happy accident was me being a little sloppy with the paint stripper I used on the top. Some of it stuck to the sides and the result was this amazing crazing in places.
I ran out of my signature glass knobs, so I used some carved bone knobs I found on clearance at Hobby Lobby. Another happy accident. They are perfect for the piece, but not what I originally had in mind.
If you read my blog, you know I'm into nice legs. These legs? Nice. Oh yeah. You can whistle. I won't be jealous.
This is one of those pieces I would love to keep, but it really needs to go to my space at Lucketts. Just a part of this business.
Whoever buys it had better love and cherish it always...
...and whistle at the legs every now and then.
There were tons of questions about waxes and I knew there would be. Do not dismay; I will definitely share more.
So sorry! I planned to have this video to you last week and I even filmed one, but I was tired and it was half-heartedly done. You deserve better than that, so I made a new one yesterday morning in my very best painting outfit. Believe it or not, I actually go out in that ratty, paint splattered sweatshirt. Someone call "What Not To Wear" on my behalf, please. I wanted to post this video last night, but it was still converting after midnight, so I had to turn in and post it this morning.
Without further delay, here is my opinion piece on waxes!
(A transcription of this video is available HERE for the hearing impaired.)
The wax I'm using in the video is called Fiddes and Sons and I purchased it from John Millen Hardware. (They lowered the price of the wax to $14.00 for my readers!) I use the Clear and Rugger Brown waxes. The other waxes I mentioned are MinWax clear and dark waxes, Johnson's Paste Wax and Hannant's Wax in Clear and Rustic Brown. Hannant's wax is available from Chalk Paint stockists.
Here are some close-up pictures of the chest I was working on in the video, as promised. You can see how the dark wax brought out the texture in the wood.
I've received a lot of questions about the chalk paint colors I used on my corner cabinets, buffet and desk, so I thought I would share (plus I'm stalling a bit until I get my tutorials done!)
The corner cabinets are two coats of Louis Blue with an Old White interior and highlights. I distressed the edges with sand paper and applied a clear wax, immediately followed by a dark brown wax. I am going to warn you. When you first apply Louis Blue, it looks bright. It calms down when it dries , even more when it's distressed and waxed and even more when the dark brown wax is applied.
The desk was dry brushed in a mixture of Paris Grey, Louis Blue and Old White with Old White highlights. It was then distressed and followed by a clear wax, then dark wax.
I painted the buffet in one coat of Louis Blue and then applied Old White to the body of the piece, leaving the drawers and inset areas blue. The piece was distressed with sand paper and then waxed with one coat of clear wax. I applied a very small amount of dark wax to highlight a few cracks and imperfections.
Surprisingly, the more I am around antiques, the easier it is for me to resist the urge to buy everything that catches my eye. This amazing wire caddy holding 12 mini clay pots was in Christine's space at Wild Rose the day I moved out. I kept looking at it. It was a siren...calling to me. My husband is outside tying the antique shoe rack to the top of our van and I'm eyeing things I want to buy instead of packing. I went back to my packing and suddenly became paranoid that someone else would come into the shop, make a beeline for the caddy and buy it while I was loading my car. When I start getting paranoid, I know I need to buy it or regret it later. I informed Lynette, "Ok. I'm getting this." and plunked it clearly on the counter. I'm so happy I did. I love this piece.
It is going to be a great prop for photos shoots and it will look awesome on a coffee table or my kitchen counter once I get to my kitchen/family room remodel. Some day...
I know many of you are waiting for specific information about chalk paint and wax techniques and I assure you I have not forgotten. I filmed some "wax" footage this week and I hope to have some resource posts for you in a few days. It's a busy season in my business, so be patient with me! Here's a peek at the piece I just finished...
I'm getting rave reviews from readers and friends who have received their chalk paint and tried it already. It truly is an amazing paint and I can't wait to share more about it.
If you missed my initial post about chalk paint, you can click the text to read all about it. If you're in the Stafford, Texas area, WonderFaux Studio is hosting a chalk paint workshop on April 20. Visit their website for more information.
The Ridgid R4512 table saw has features -- including an integral lift/caster mechanism, a tool-less blade guard and riving knife, an accurate fence and good dust collection -- on par with much more expensive saws. While it’s easy to get caught up in comparing tolerances, the most important thing to know about a table saw is whether it will do what you need it to do within your budget and space constraints. I generally make furniture and small items in my basement shop. I need a table saw that handles these tasks accurately and safely without making too much dust and noise. For full disclosure, Ridgid sent this saw to me for this article. That said, I think this saw will meet my needs for years to come.
The first thing I notice is that the Ridgid R4512 is imposing enough to inspire confidence. Weighing in at 266 pounds, this thing isn’t going anywhere. To back up that feeling even more, everything under the table is cast iron. There are no plastic gears like on similarly priced saws. The blade height and angle adjustment wheels turn smoothly and lock where you want them. Likewise, the fence, which clamps itself to the front and back of the table, stays where you put it. On the downside, the stamped steel wings are not as flat or substantial as cast iron wings and the edges are rounded, which produces a small seam. This is a feature that I chalk up to the saw’s relatively low price. I will say that the wings are certainly flat enough for my purposes.
The next thing I notice is the saw’s sound, which is more like a cabinet saw than a contractor saw. Instead of a high-pitched screech, the R4512 has a medium-pitched hum (the critical test: my wife can barely hear it on the first floor of our house from my basement shop). As far as vibration, I was able to successfully perform the nickel test and the penny test with no toppling. (See video below.) That isn’t a terribly scientific test, but it does show that the saw’s construction has enough integrity that it can handle the forces of the motor without wobbling. The last thing you want a table saw to do when you are using it is move.
The safety features are a big part of what makes the R4512 so appealing. The two-piece blade guard clicks onto the riving knife and locks into place with a lever, so you don’t have to use a tool to install it. It tilts with the blade to prevent having to remove it for angled cuts (which makes it more likely that users will keep it installed). Likewise, the riving knife has a lever release that allows it to be raised to a high position for through cuts, a medium position that leaves it lower than the blade or removed altogether. It was easy to adjust to be in the same plane as the saw blade. Kick-back pawls are also attached to the riving knife. I found them to be dull where they need to be sharp and sharp where they need to be dull. It is hard to make them grab a board and it is easy for them to scratch a board as it passes under them. My solution will be to sharpen the teeth a bit with a file and dull the bottom edge. The blade guard is very easy to remove and replace. I wish the riving knife were just a hair (almost literally) thinner so it could accommodate thin kerf blades, which are easier on the motors of this category of saw. Some might consider it to be close enough to use with thin kerf blades. It might well be, but I haven’t tested that so I can’t comment on it.
The built-in lift mechanism is strong and works incredibly well. Pushing the foot pedal down makes the saw seem to float. Pull the pedal back up and the saw hits the floor with a satisfying thunk. This feature is critical to me, as my basement shop is not only small but awkwardly spaced. Being able to move the saw around with not much effort helps a great deal.
The aluminum fence, while not perfectly straight, was aligned pretty dead-on out of the box. I took it out of alignment and put it back just so I could see how it works. You loosen four bolts, square the fence to the blade, then re-tighten the bolts. Very straightforward. It moves smoothly on rails at the front and back of the table and locks onto both. Speaking of the rails, because I have such a small space to work in, I’m going to eventually use only the longer of the two pieces so the rails don’t extend as far out and the saw has a smaller footprint. (You can see an example of someone doing that here.) This modification only involves drilling some holes in the aluminum and is something I think Ridgid should consider offering as a feature. One other thing about the fence. The measurement lines are positioned too far to the right, making it impossible to line up the fence to a precise measurement. I’ll come up with a work-around, but this is something that should have been caught at the factory.
The miter gauge feels heavy and substantial and works well. The only problem is that it is difficult to adjust because the fence turns a bit when you tighten it down. I do like the storage place for the miter gauge, which keeps it handy but out of the way. The blade is a 40-tooth combination blade. Mine produced saw-marked rip cuts and cross cuts with tearout. A new blade (or two) will be my first upgrade. Update: I added a brand new Forrest Woodworker II blade and have had excellent results so far.
Another appealing feature of this saw is the dust collection. The motor is enclosed in a cabinet and there is a plastic funnel where sawdust falls. It has a 4” port that fits a standard dust collector hose. In my limited experience, a negligible amount of dust escapes, which is a great thing in my small work area. Another plus is that the cabinet dampens sound. One improvement I would suggest is moving the port, which is located in the center, to one side but still oriented toward the floor. Its current location is right above the cross bar for the lift mechanism, making it difficult to attach the hose. An offset port could be used on the right or left side depending on the user’s dust collection set-up. My solution is to use an adapter with a 2½” hose which is easier to bend without touching the lift mechanism.
Assembling the R4512 was very straightforward. There were no surprises, the instructions were clear, everything was included and nothing had been damaged in shipping. It took me about four hours total to assemble the saw and another two or three to fine tune the blade alignment, angle stops, fence and miter gauge. (You can watch the Keystone Kops version of me assembling the stand here.) One of the criticisms I keep reading about saws with table mounted trunnions is that you can’t align the blade to the miter slot. I can say definitively that the blade on this saw can be aligned. It could be an easier process but it is certainly doable. (You can read about my experience aligning the blade here.) An earlier model, the Ridgid 3650, apparently had a cam system that made aligning the blade very easy. It would be an improvement if the R4512 had the same thing.
Finally, Ridgid offers a lifetime warranty on the R4512. This is an important distinction from the other manufacturers who offer similar versions of this saw. Sears Craftsman offers one year for defects in materials or workmanship (you can purchase additional coverage) and Steel City offers a five-year warranty.
I may nitpick here and there, but I don’t want that to overshadow my very positive feelings about this saw. The build and power, safety features, dust collection and built-in casters make the R4512 work well for my purposes. I fully expect to get years of good use out of this saw. It isn’t as accurate or powerful (or expensive) as higher-premium saws. However, if you want a solid performer with good safety features that is built to last a long time, the Ridgid R4512 will meet that standard.
You can see all my posts about the Ridgid R4512 here. I'll write more posts and film more videos as I use the saw in upcoming furniture projects.
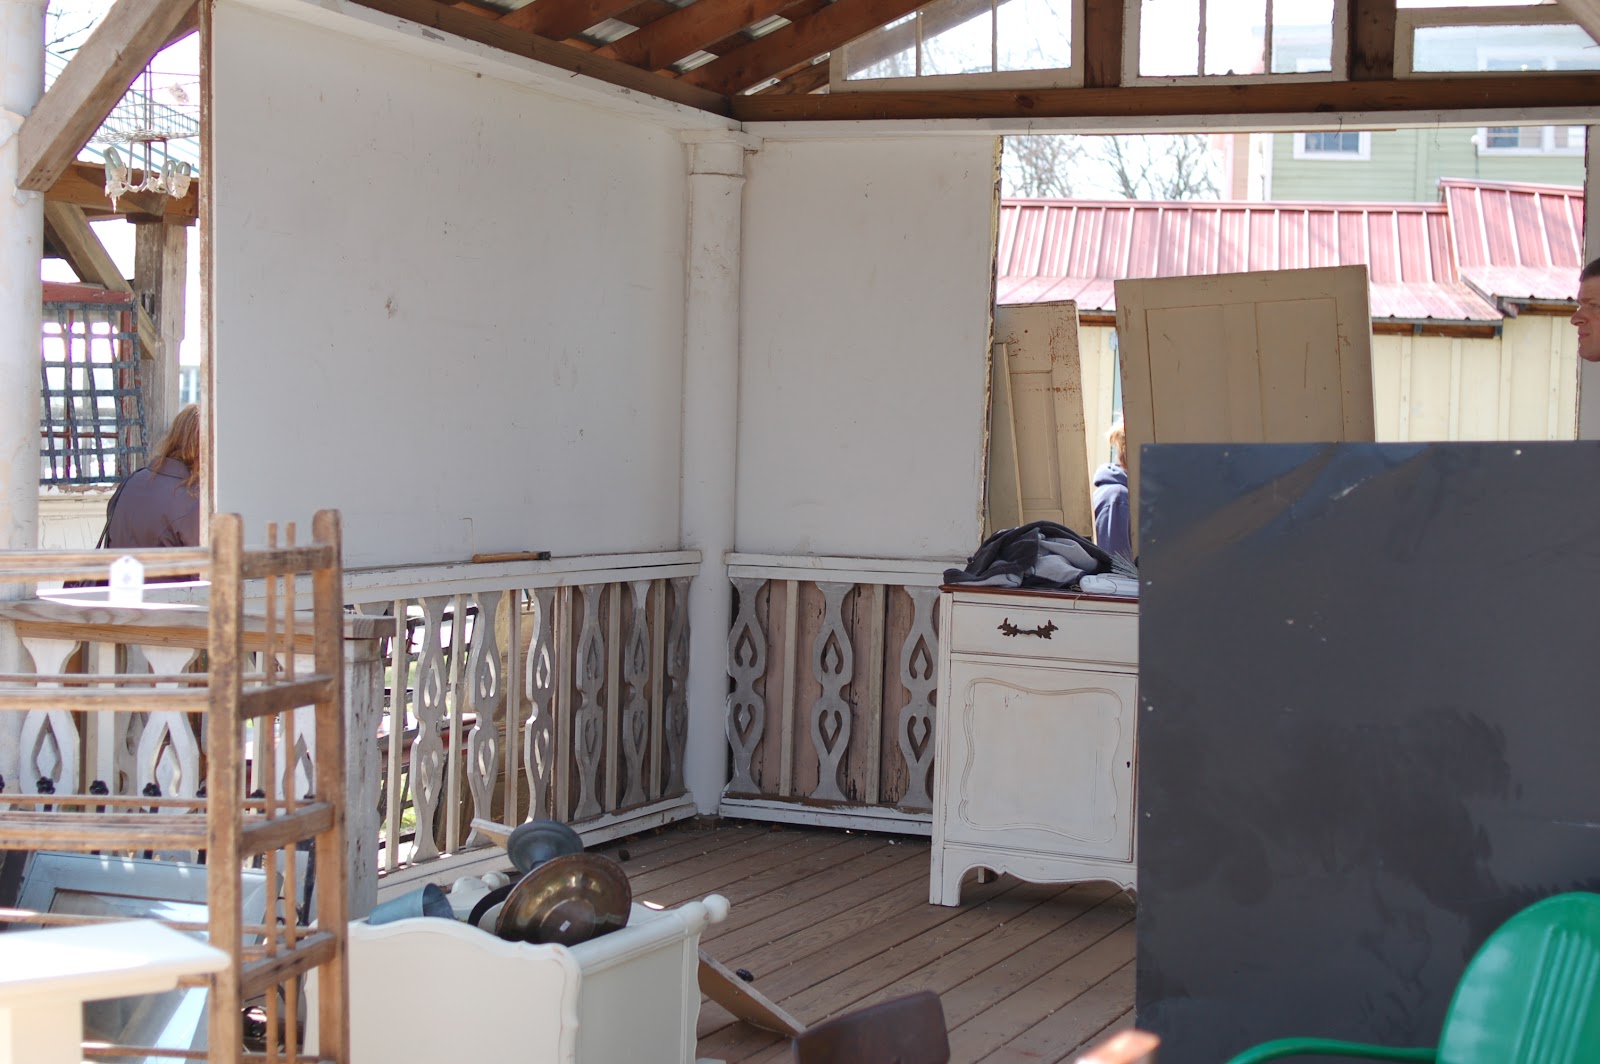
Ok. It's cheese ball to call this the pavilion of dreams. I acknowledge that, but I'm feeling sentimental and optimistic this evening. After a long day of hard work, I am moved into my space at Lucketts. My space.
It's amazing. I welled up when I stepped back and looked at it. (There was going to be a mahogany library table in the middle, but that sold before I could get set up!)
The space is big, allows in great light and is filled with character and charm. I love, love it and am so excited to be a part of the antique store that I have loved and shopped at and drooled over for about ten years. It truly is a dream come true and a business goal I can check off the list.
I made some hand painted banners to hang from the ceiling and I'm going to make even more to fill the ceiling with all sorts of interesting and pretty things.
I hung a piece of metal painted with chalkboard paint to display all of my German glass glitter letters. I love how graphic and interesting it looks.
It was a chilly day, but I didn't mind at all. I thoroughly enjoyed arranging furniture and vignettes while my wonderful husband hung doors, windows and plastic to better protect my things from the elements.
I borrowed the Biblical quote from Barb of Knack. She has this quote in her home and it's what popped into my head when I needed to write something on my chalk board.
I snapped the photo above when we started this morning. See the huge holes? This was not going to fly with my furniture in it, so we used some doors from my "I am a thief" post, a little bit of exterior grade plywood, some windows and clear plastic to enclose the space. Now I don't have to hyperventilate every time there is rain at Lucketts.
I think Donna would approve of my junk patchwork walls.
My husband is going to make a hanger for my sign, but for now, it's leaned up at the opening. We simply ran out of time today. Seeing my sign there is amazing.
I've got a lot of work to do over the next few days to get more pieces ready to fill up the space. I'm giddy to get to it, but lack the energy tonight. I can't wait to snuggle in my bed and dream of my future at Lucketts.
If today wasn't exciting enough, the cherry on the top was seeing that I was featured by The Nester in her Bird Watching post. Can a girl stand it all?