I was asked by Amy at The Lemon Cottage if I would do a tutorial on gold leafing.
So, Amy, this one's for you!
I purchased an entire armload of large, dated frames at an auction for a quarter. I was not quite sure what I was going to do with them at the time, but the auctioneer looked at me and almost pleaded me to take them off his hands. These two frames were in that lot.They are clearly 1960's-70's style frames and not at all my taste. They had an interesting texture that seemed like a great candidate for gold leafing. I'm showing you how to leaf a frame, but you can leaf almost anything.
First of all, make sure your surface is clean. Also, what's underneath the leafing may peak through, so make sure it's a color that you don't mind seeing. Red is a popular color to put under gold, but I decided to leave these frames white. Brush a metal leaf adhesive onto your surface. And allow it to dry for 30-60 minutes or until it's clear and tacky.
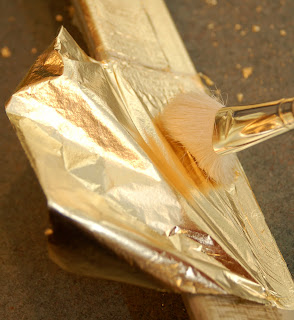
You need a soft mop brush to apply your gold leaf.
This brand of (imitation) gold leaf is available at most craft stores for about $9.00 for 25 sheets. You can also purchase silver and copper leaf. One package is enough to cover at least 2 large frames.
There are all sorts of methods out there for getting your gold leaf out of the book and onto your surface. You can use the static cling on your brush to pull the sheet off and lots of other things. I just slip it off onto my hand and gently transfer it. I feel like I have more control over it. The frame I am working on is about 3 inches wide, but if I was working on a narrower frame, I would cut the gold leaf sheets in half while they were still in the book. That would greatly reduce any waste. Once the gold leaf is on your surface, take your brush and light smooth the sheet down.
Now, don't start to panic. You're going to have all kinds of little wrinkles and if you're working on a textured surface, you'll have a lot of cracks in the leaf. This is normal and you're not doing anything wrong. If you're working on a flat surface, this won't be as much of a problem.
Leafing always looks like a mess when you first put it on. I like to pull off larger "scraps" and stick them onto bare spots. So, once the surface is fully covered, gently rub your brush over the leaf, removing all of the pieces that are not glued down. At this point, your work area will look like Tinker Bell exploded all over the place. Leafing is very messy, so have a vacuum at the ready.
This is how it looks after all of the excess is brushed away.
See how there are some spots where the leaf didn't stick. I'm not worried about these, since I'm going to antique this frame. If you want your surface to be perfect, brush more adhesive on the bare spots and repeat the process.
Since the backside of this frame would only be seen from an extreme angle, I painted it with gold acrylic paint.
Once the gold leaf and paint were fully dry, I brushed on some Minwax dark walnut stain and wiped it off with a soft cloth. This calms down the "brassiness" of the gold leaf and makes it look softer and older.
I cut my own mat using my new mat cutter and framed a $2.00 thrift store antique bird/botanical print. I then had a $3.98 sheet of glass cut at my local glass shop. So, this entire project cost less than $10.00. Remember that the Furniture Feature Friday link party runs through Saturday at midnight, so you can still join in. Happy leafing!

I'm linking up to Frugalicious Friday over at Finding Fabulous, Thrifty Decor Chick's Before & After Party, Met Monday, Make It For Monday, and Make Your Monday. Whew! Glad I don't have to buy a hostess gift for everyone.


