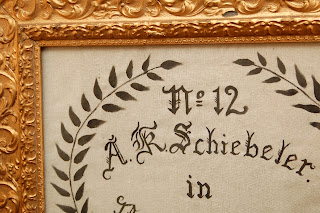
As promised, I am going to share my secrets of how I made my Antique German Grain Sacks. I am so pleased with how these turned out, but I am afraid that some of you might be mad at me when I reveal how I did it. Do not dismay, I have some alternatives...
First of all, I used the fabric that I purchased from Wal-Mart for $2.47/yard called Osnaburg. It's a nubby, natural fabric with a loose weave and is an inexpensive substitution for linen or hemp.
Cut a piece to your desired size. If you're going to want this to be washable, wash it first! This is cotton, so it will shrink. I'm going to frame this piece, so I just ironed it out and cut it to the size of my frame. Back the fabric with a plastic bag to protect your work surface from any paint that bleeds through.
I used acrylic craft paint in Pewter Grey (Apple Barrel 2620), Black (Apple Barrel 20404) and Burnt Umber (Creamcoat 02026.) The ratio is about 30% Pewter, 60% Burnt Umber, and 10% Black. Using a straight black would look too stark and new. This dark grey/brown color looks like a warm, faded black.
I used a 10/0 liner and a no 4 filbert brush. The liner was used for the lettering and details and the filbert for the leaves.
Ok, here's where you're going to hate me. I then painted the design. Free hand. Sorry! But, I do have some ideas for those of you who are not comfortable with this. First off, make sure you follow my Workshop Series, Decorative Painting 101. Until you are a proficient decorative artist, you can cut your own stencil out of card stock using a printed image as a template. Another idea is to use chalk to draw out your design and then paint over that. Any chalk will come out in the wash. Lastly, you could tack the fabric to a wall and use a projector. 

I started with the writing that is top and center. This gives me a reference point for everything else.
I started in the middle with the second line and lightly painted the lettering.
I then added the lettering that was to the left of center.
Once the 2nd line was complete, I filled out and added the detail to the lettering.
I continued with other lettering in that same manner. Then, I drew the "vine" around the lettering and added the leaves.
I wanted to show you the paint that bled through the fabric on the bag. Don't do this project on your newly painted table...you will be sad.
I put the finished product in my $1.00 antique yard sale frame (with wavy glass and all.)
I love it! I can't wait to make more.
Now, before everyone gets all over me...yes, I know the lettering is not even. If you look at antique grain sacks, guess what? The lettering is not even. I can instantly tell a reproduction because the lettering is too perfectly spaced. It's clearly made with a modern stencil. The imperfections make it look more authentic. (By the way, I'm just teasing those who busted me on my crooked tray. It was slightly tipped and I righted it. I'll have to get a level out with this crowd!)
I'm also planning to make some pillows and try some different paint colors and designs. The good news about using this for pillows is that you can machine wash and dry it. The piece below just came out of my dryer and it looks even better. It fades the paint just slightly and softens it up.
These will be for sale in my Esty shop, which will be opening soon. So, if you see a feed sack pillow you love, but it's like $100, get in touch with me and I can replicate it for you for a lot less!
The Workshop Series, Decorative Painting 101 starts tomorrow with Getting Started - What to Buy. Don't miss it! I'm also still looking through all the of the Furniture Feature Friday links and I have already seen some awesome makeovers. I am very impressed, ladies!
I'm posting this to DIY Day at A Soft Place to Land and Show and Tell at Blue Cricket Design
and


